
Why A Kit?
Biomaterials are not readily available to everyone today. That needs to change. We think amazing things will start to happen when renewable materials are more accessible and easy to use. And, we’ll all leave more fossil fuels in the ground.
About The Kit
How much of the resin is included in a kit?
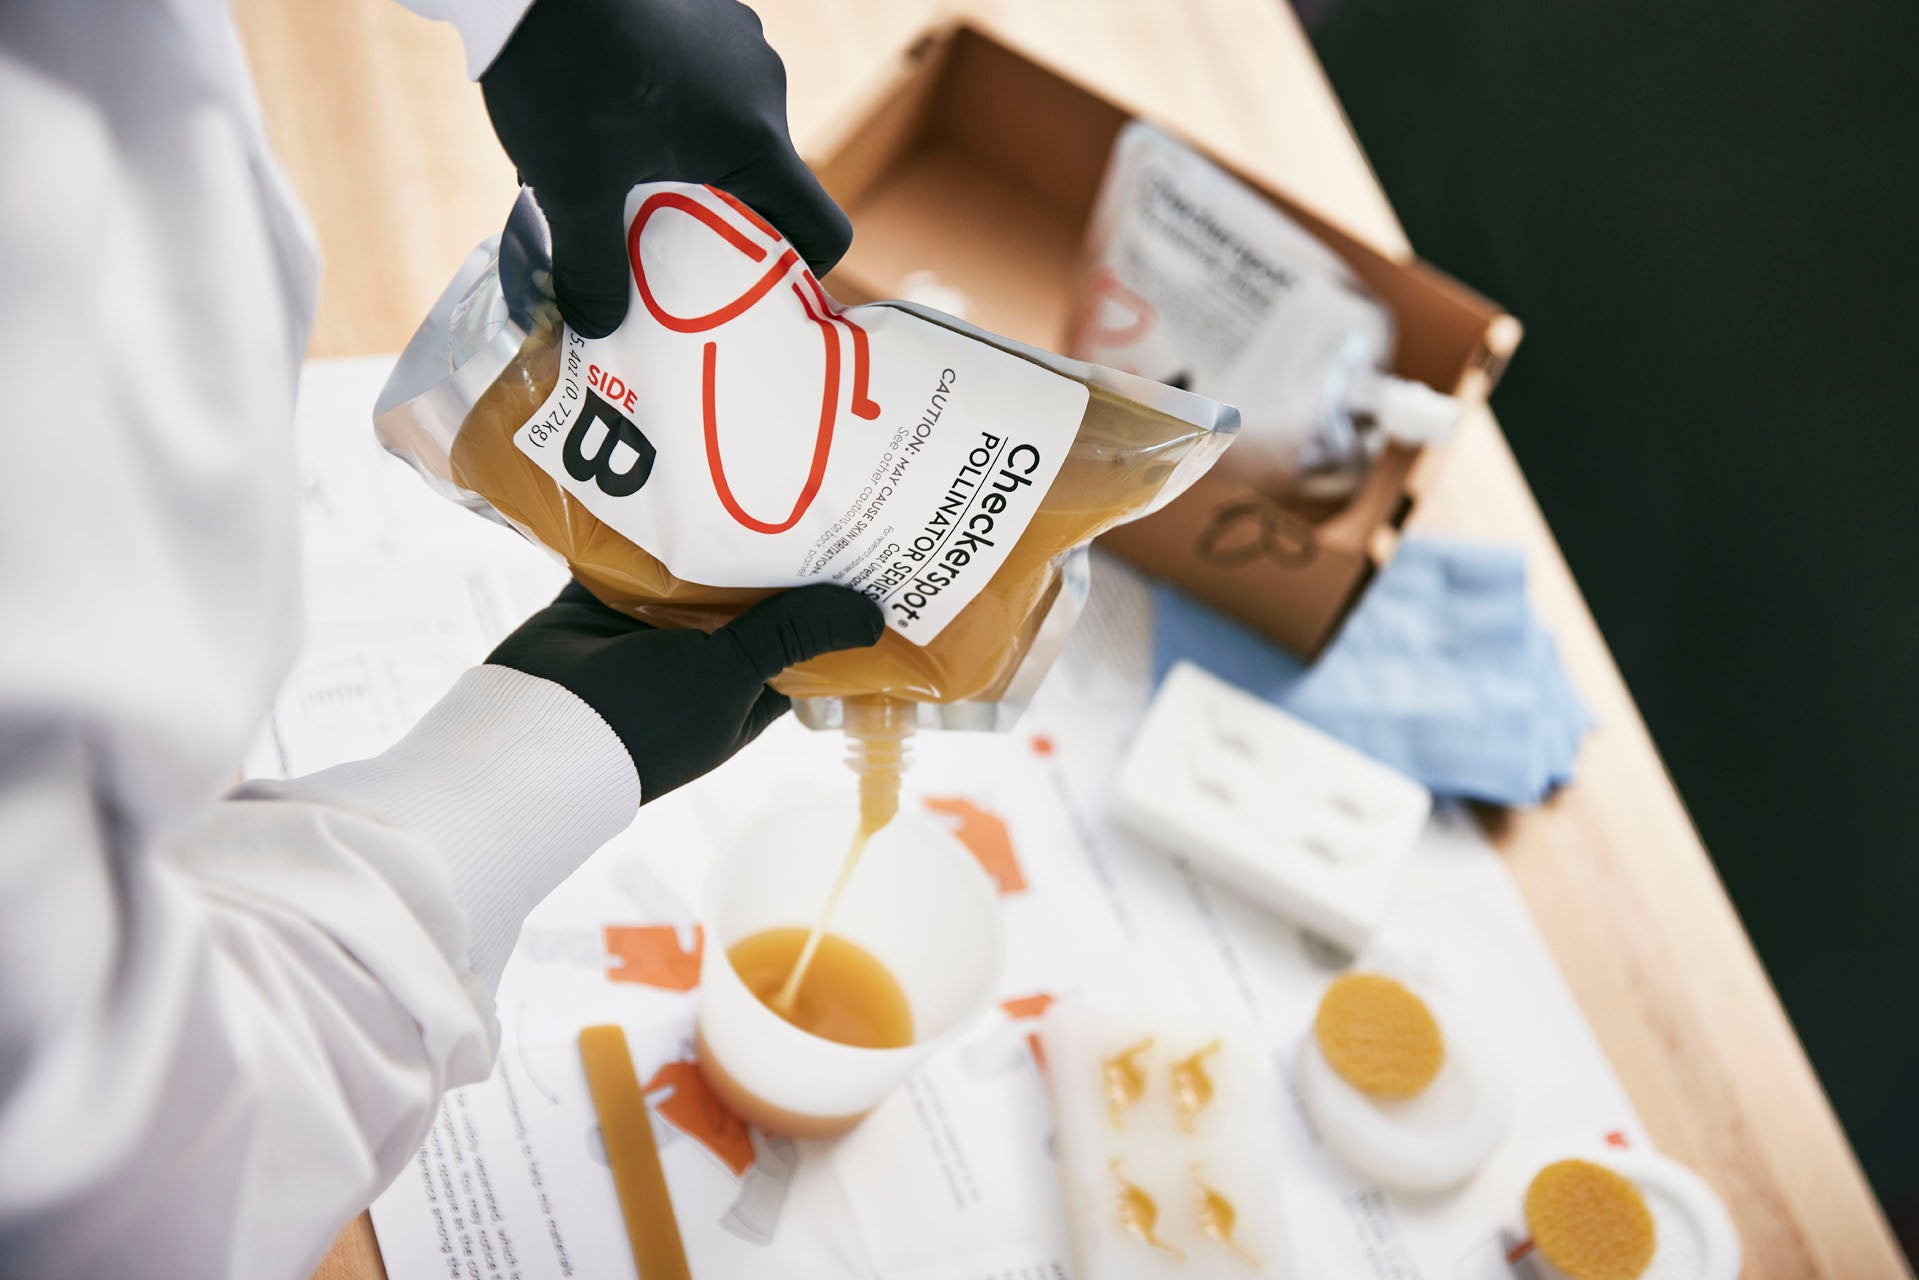
The kit comes with 1090 mL of Checkerspot’s Pollinator® Series Cast Polyurethane System. That’s 360 ml (0.42 kg) of Side A and 730 mL (0.72 kg) of Side B.
It’s enough material to make many skateboard wheels, or a variety of climbing holds, or several surf fins, or lots and lots of headphone cups, grips, handles, pulls, or whatever else can be dreamt up and cast.
How should I store the kit?
Store the kit in a dry, well-ventilated place away from high heat, flame, and direct sunlight. Protect it against physical damage and humidity. We recommend storage between 70-90°F (18-32°C).
If the kit is stored is <70°F, then ensure it has sufficient time to warm to 70°F before use.
Partially used pouches should be recapped and stored standing upright. To close the spout lid, apply the lid to the spout nozzle and twist to the right tightly.
Closed pouches can be stored in tightly sealed secondary containment. This is especially recommended in high humidity environments.
What is the kit’s shelf life?
We recommend you use the Pollinator™ Series Cast Polyurethane System as soon as possible after you receive it. For best results, use within 6 months.
Why pouches?
Castable polyurethane formulations usually come in heavy plastic bottles that take up a lot of space during transportation. We chose to use pouches as they ship flat before filling and are lighter when filled, cutting down on transportation emissions. We also found that mixing the material in the pouches and pouring through the spouts was easier to maneuver and less messy than using a bottle or bucket.
Three kinds of algae, really?
Yes! We use three kinds of algae in our kit. Well technically, two kinds of algae and 1 cyanobacteria.
The Pollinator formulations incorporate Checkerspot® Algal Polyol 001.
The cardboard mailer is printed with Living Ink’s Algae Ink™.
The colorant of the Spirulina blue kit options uses a blue pigment isolated from Spirulina, provided by our partners Spira and DIC.
What parts of the kit can I reuse?
The Whole Everything Kits include a reusable silicone mixing cup and mixing stick.
When using the silicone mixing cup, allow any residual material to cure. Then, peel it out of the cup and dispose of it properly. (Find more instructions about cleanup here.)
When using the mixing stick, wipe it with a paper towel after mixing and allow to cure before handling again.
You can also use the box as secondary containment to store the pouches in your workshop.
The Pollinator™ Series Formulations and Casted Material
Everything you might want to know about the physical properties.
What are polyurethanes?
Polyurethanes are a class of polymeric materials generated by reacting two types of chemical subunits, isocyanates (molecules with multiple reactive isocyanate groups) and alcohols having multiple reactive hydroxyl groups (called diols, triols, and polyols).
In the universe, there are many types of isocyanates and polyols. Different formulations can be achieved by combining different subunits and by varying the amount of minor formulation ingredients.
As a material class, polyurethanes are found everywhere. From the foam in your couch, the coatings on your car seats, the adhesives in your shoes, the wheels on your roller board, the bushings enabling the motion of millions of machines, as well as in tens of thousands of other products, polyurethanes a vital material for our modern functioning world.
What part of these formulations are biobased?
The Pollinator Series formulations are made with Checkerspot's Algal Polyol 001, a USDA Certified Biobased Product. Each item made solely from the resin system will be ≥56% biobased (ASTM D6866).
What are the physical properties of the casted material?
Here are typical properties of the Pollinator™ System - Natural when cast as instructed
Shore D Hardness 70 - 80
Tensile Strength (MPa) 38
Flexural Strength (MPa) 1360
Elongation (%) 10
Here are typical properties of the Pollinator™ System - Spirulina when cast as instructed
Shore D Hardness 65 - 75
Tensile Strength (MPa) 15
Flexural Strength (MPa) 530
Elongation (%) 45
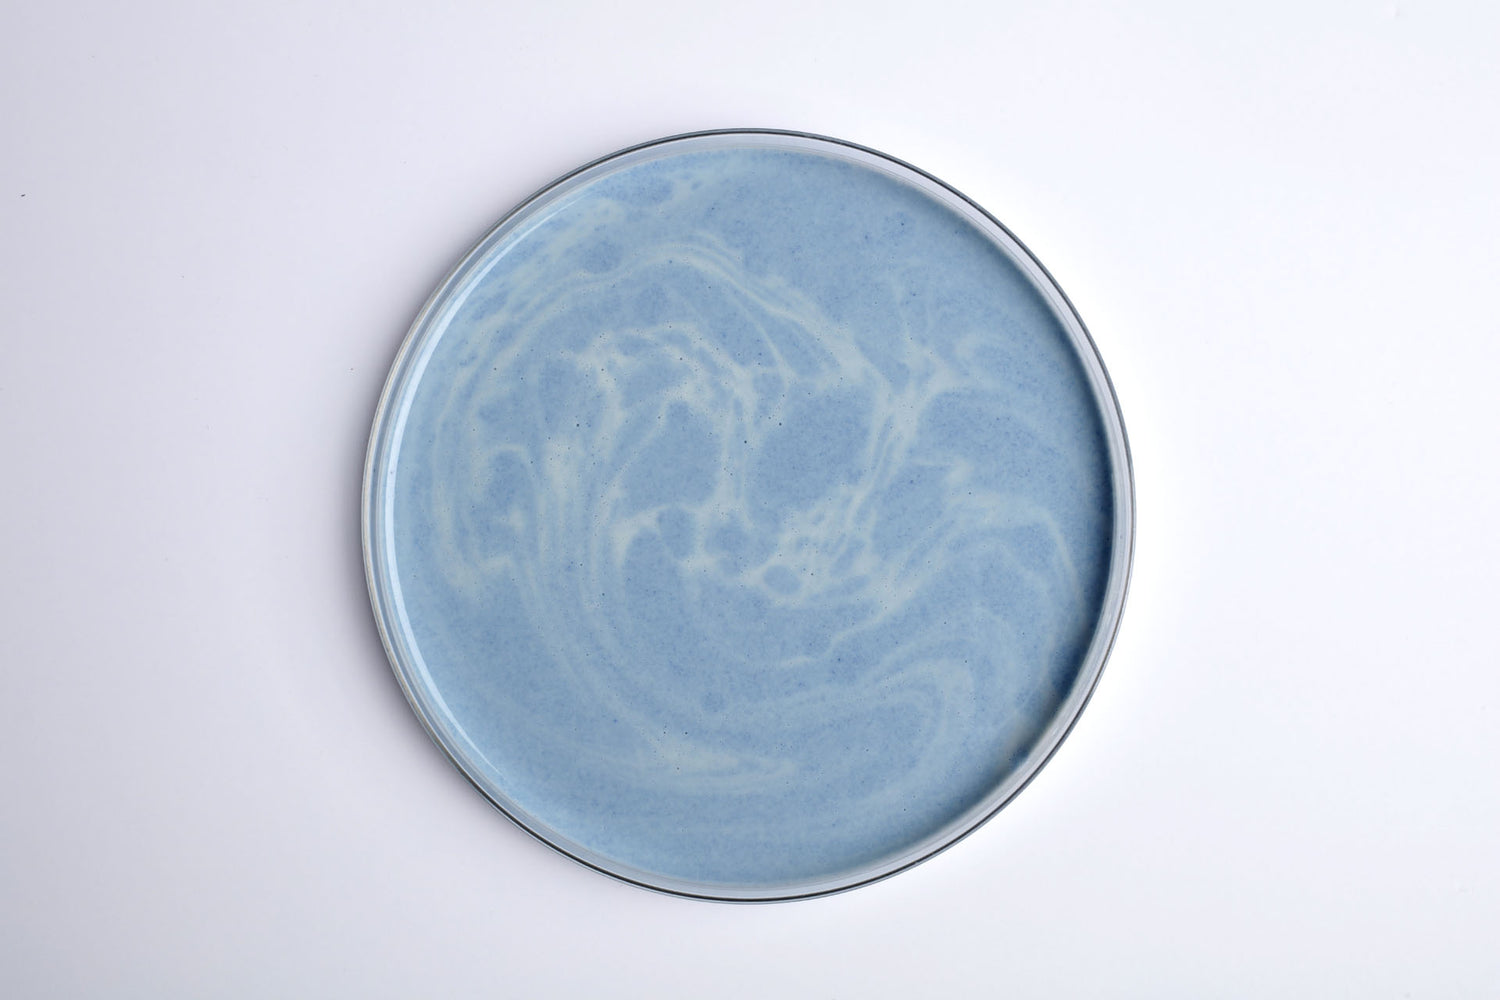
What do parts look like after the resin is cast?
The appearance of cast parts will depend on the surface finish of the mold you are pouring into and any pigment that was used to color the part. The Pollinator Series formulations can duplicate nearly any surface finish —from high gloss, to rough sandcast to machined textures. We have found that using a light texture helps the material feel more luxurious and high quality. We encourage trying different finishes to see what works best for your application.
In terms of color, the natural unpigmented Pollinator Series urethanes have a beeswax base color with a bit of translucency in thin sections. Adding pigment will add color and also, depending on the amount of pigment added, it will make your parts more opaque.
What do parts feel like after the resin is cast?
The handfeel is warmer and softer than most plastics. The surface has a tiny amount of give to it. Because this material is cast and not injection molded there is more freedom in part design. We’ve used this to make parts feel more high quality and substantial by using variable and thicker sections for added strength and longevity. Our favorite parts have been satin finish (think 400 grit sandpaper) and a little more beefy than the equivalent part in a standard injection molded plastic part.
Mixing, Pigmenting, Casting, and Post Processing
What’s the best way to mix this polyurethane system?
For many users of this kit, hand mixing will be sufficient to create durable, long lasting parts. We like this format for pours of ~120-300 mls. Plus, there’s less mess to deal with afterwards and little waste.
For larger volumes, >300 mls, consider a small paddle mixer that attaches to a hand-drill, being careful not to entrain air.
Greater part-part consistency with little to no entrained air can be achieved through use of static mixing tips. We recommend tips with at least 40 elements.
You should consider the mixing method that is best optimized for your project, taking into account your needs for material use, disposable waste, cost, and part-to-part consistency.
No matter what mixing method you choose, ensure that the B side pouch is sufficiently shaken prior to dispensing. The B side liquid should be homogeneous in consistency and color before using.
Does it come with a mold? How do I make one?
This kit does NOT come with a mold.
Here are some of our favorite resources for how to make your own silicone or 3D printed mold:
How to make a 1-part mold of a 3D printed object
Making a more complex 2-part mold
How to make a 3D Printed mold - Quick Guide
How to make a 3D Printed Mold - In Depth
Can I add color to this material?
Yes! The unpigmented formulation readily accepts many types of colorants.
We’ve tried adding both natural and synthetic pigments to the material. Natural pigments work, but are not UV resistant. Certain synthetic pigments will withstand UV degradation much better.
To learn more about pigmenting materials, here are a few resources that we like:
Traditional pigmenting in urethane
If adding color, it is important to consider the A and B sides base colors. Side A is a dark brown. The unpigmented Side B is creamy honey color.
If tinting or pigmenting, add your colorant directly to Side B. Mix the colorant-Side B mixture thoroughly before adding this mixture to Side A.
A good starting point to test many pigment packages is 1% by weight of the final part.
Once my part is cured, can I paint it? Glue it? Mill it?
Absolutely. This material paints, glues, and machines nicely.
For gluing, we’ve had the best results using cyanoacrylate glues but other types of glues and epoxies are likely to work depending on the type of joint you want to create.
For painting, we suggest prepping the surface with a light sanding then an even coat of primer before painting. Occasionally, the first part out of a new silicone mold will have a little silicone oil residue on it which in some cases can keep paints from sticking. If this happens we suggest either cleaning the cured part with some light solvent like IPA or casting a second copy.
For machining, like most other plastics, it loves fresh cutting tools with sharp edges to avoid abrasion and gumming up.
Where can I buy other equipment and materials?
There are a bunch of places out there, here are two of our favorites:
Douglas & Sturgess (Bay Area, CA)
The Compleat Sculpture (New York, NY)
Health & Safety
There is a Prop 65 warning on the B Side bag. Why?
The pigment package in the Spirulina kits contains TiO2, a chemical that is on the California Proposition 65 list.
California's Proposition 65, also known as the Safe Drinking Water and Toxic Enforcement Act of 1986, requires businesses to provide warning to California consumers if they may be exposed to chemicals known or suspected to cause cancer, birth defects, or reproductive harm. As of August 2018, California has listed more than 900 chemicals subject to Prop 65 regulations, which can be found in many common household products, food, drugs, dyes, or solvents. For more information about these chemicals and products, please visit the CA OEHHA website.
What kind of PPE do I need to use?
You should wear long sleeve garments, gloves, and close toed shoes. Safety goggles will protect your eyes in the event that inadvertent splashing of a material occurs.
We have a complete list of recommended PPE in our instructions manual, which comes with the kit and can also be found here.
For addition health and safety information, check out our SDS manuals here.
How do I dispose of this material?
The best way to dispose of any unused material is to mix the two sides together using the correct mix ratio, then allow the material to harden.
We have safety and disposal guidelines here.
If you have any questions, please contact your local waste service provider.
Troubleshooting
Solving issues with casting.
My part has bubbles. What’s up with that?
Bubbles can be a frustrating element of casting with polyurethanes. Here are some reasons why bubbles may form.
- Air was entrained at some point in the mixing or casting process.
- Moisture was incorporated from the environment, from the mold, or from the A or B side pouches and is causing foaming.
Here are some steps you can take to limit, shrink, or avoid bubbles:
- Cast at room temperature. If storing A and B sides below room temperature, allow them to come to room temperature before mixing and casting.
- If using a paint mixer or hand drill, ensure the blades are below the mixture while mixing.
- Once mixed, you can pop large bubbles by knocking the mixing cup gently - careful not to splash. Similarly, once cast, the mold can also be vibrated to expel bubbles.
- If working with a closed mold, build vents into the design of your mold to allow air bubbles to escape.
It’s taking forever to cure. What can I do?
You should expect that your casted parts can be demolded ~18hrs after casting. However, it may take up to a week for your part to be fully cured.
Some things to consider:
- Is your kit stored below room temperature or is your casting and curing environment below room temperature (72°F / 23°C)? Colder environmental temperatures will slow things down. Expect a longer pot life and delayed cure time if working in temperatures below (72°F / 23°C).
- If temperature is not an issue, then consider your mix ratio. If that was off, then your parts may be more flexible and appear to be undercured
- You can use heat to accelerate cure times. You can cast the part in mild heat (150°F (65°C)) while inside the mold or expose the part to mild heat after demolding. If you opt to go these routes, please use an industrial oven, a hot box, or a tented covering next to a warm, sunny window. Do not use your kitchen oven! Allow your mold to cool to room temperature before demolding, and allow your part to cool to room temperature before handling.
I think I used the wrong mixing ratio. What might happen?
Here are some possible scenarios:
- You used more A side: your part will be harder and stiffer than if the correct mix ratio was used.
- You used more B side: your part will be more flexible than if the correct mix ratio was used.
We recommend that you closely monitor your part before demolding or handling it, as a different mix ratio can change the cure time. If your part isn’t curing properly, we recommend recasting your part with the correct mix ratio.
I want a part that is stiffer / softer / has more {x,y,x}
Contact us! We can custom formulate to achieve a range of properties. We want to talk with you about your project, part, product, and process.
My part turned out greenish, but the B side bag was blue. Why?
Side B pigmented with Spirulinais a great brilliant blue. When mixed with Side A, a dark brown yellow liquid, the result is a celadon green hue, Pantone 559C.
I used the formulation after storing it for a long time. Or in high humidity. What might happen?
The product may either cure improperly or the A side may begin to solidify in the bag. Absorbed moisture can cause foaming or an improper cure when the A and B components are mixed together.
My bag leaked. What do I do?
Don all recommended PPE (including gloves, safety glasses, long sleeves and pants, closed toed shoes, and respiratory protection).
Immediately place the bag in secondary containment, such as in a sealable plastic bag. Or, transfer the contents of the bag to a clean and resealable container.
Depending on the magnitude of the leak and how long the leak was exposed to humidity, the product may still be usable. Keep the product sealed in secondary containment.
The best way to dispose of the material is to react the A and B sides together, then allow the material to fully cure. If you are unable to salvage the A and B sides, use appropriate tools and methods (e.g., dedicated rags, spatula, or careful folding of the disposable protectant surface) to put the leaked contents in a convenient waste disposal container or garbage bag. Tightly close the disposal container/bag to prevent release of the spilled material. Finish cleaning the surface with water and a mild soap or detergent. This material should be prevented from contaminating soil or from entering sewage and drainage systems and bodies of water. As a result, the use of disposable rags is recommended and the rags should be disposed of with the spilled contents. Check with your waste service provider for any special rules on disposing of the sealed disposal containers and bags.
Sustainability, Beginning of Life, End of Life
Everything you want to know about the end of life, beginning of life, and the stuff in between.
What are the End of Life options for this material? Is it recyclable?
Sad to say, most polyurethane today ends up in landfill. But, it doesn’t have to. There are non-landfill options.
Physical re-use. You can re-use your parts in other products. Learn more about grinding and reuse. Check out what our colleagues at WNDR® Alpine are doing here.
Waste to energy. In some countries, and even by some municipalities and companies, polyurethane waste is used to generate power for solid waste incineration.
Chemical Recycling. If you’re asking if recovering the component molecules and reforming them is possible, then the answer is yes, it’s theoretically possible. Steps like hydrolysIs or glycolysis can break down polymers into various raw materials that can then be utilized either as resources for processes unrelated to polyurethane production as feedstocks for new PU synthesis.
But in practice, chemical recycling is not widely implemented. Costs and energy associated with infrastructure, material aggregation, and chemical purification make it such that chemical recycling is not widely practiced. Unless you’re solving for re-use or have a waste to energy plant, it’s likely that the parts you make from these kits will end up in a landfill at the end of their (hopefully) long lives.
Since this material is biobased, is it also biodegradable/compostable?
No, this polyurethane is not biodegradable or compostable. Biodegradable polyurethanes do exist, but they use different types of chemistries than those found in the Pollinator Series resins.
So this material isn’t recyclable or biodegradable.What is the environmental benefit of using it?
For starters, this material is made in part using a biobased, renewable resource. We leave more carbon in the ground this way. While it’s a small step now, it’s a step. And, we’re small now, but consider how much polyurethane is made on the planet today. Much of it could incorporate renewable building blocks.
The type of renewable content and how it was created matters too. Not all renewable content is created equally! Because the type of microalgae we use needs sugar to make oil, the source of sugar and how that sugar is grown is critical. Some sugar crops and cultivation methods can be highly productive from a land-use perspective and require less water and pesticides compared to other ways of harvesting oil.
So, by substituting oil derived from low resource intensive sugar crops for fossil fuels, we not only leave more carbon in the ground, but we also have the potential to improve land, water, and pesticide footprints over other forms of triglyceride oils.
How is this renewable material made?
We start with an oil from microalgae. The oil is in the form of a triglyceride - visually, it looks like sunflower oil or canola oil. But, the microalgal oil is particularly enriched for specific molecular structures. We then apply chemistry to add reactive groups to the oil. This creates a polyol. Reacting a polyol with an isocyanate creates a polyurethane.
Why use a polyurethane over a thermoplastic?
One reason is that polyurethanes can last far longer than most thermoplastics. A great way to reduce carbon use is to make durable parts that can be used longer!
Why microalgae?
Microalgae, the type used in making Checkerspot’s polyols, are phenomenal at making specific types of oils. They use sugars as a carbon source, so they can be grown in controlled fermentation systems. These microalgae grow quickly and can be up to 80% oil.
Want More, or Something Different?
How do I buy more?
You can buy more kits here.
Please contact us if you are looking for larger volumes (gallons, drums) or if you would like to order multiple kits to the same address.
Can Checkerspot make high biobased formulations that are squishier, stronger, transparent, neon pink?
Yes, we can! We can custom formulate to achieve a range of properties. We want to talk with you about your project, part, product, and process. Please contact us to discuss.
Is it a foam? Can it be foam? Can I get some foam?
This is not a foam.
But, we have developed a high biocontent rigid polyurethane foam that we’re using in outdoor recreation products. Please contact us to discuss.
Who is Checkerspot, and what do we do?
Learn more about Checkerspot here.